Senin, 28 September 2015

Generate a CSR with OpenSSL

This article will go through the first step of creating and eventually installing an SSL certificate. You'll use the same steps whether you are getting a traditional SSL from an authority like Verisign, a self signed certificate or the '*' Wildcard certificate. Most of the information is taken from RapidSSL's support documentation, which is also a great place to buy a certificate. The Rackspace Cloud is not a certificate authority and does not resell SSL certificates so you will need to go to a third party solution and purchase a certificate using this certificate signing request (CSR).

Prerequisites

What you'll need first is to install Openssl on your server, this is a common package and will be available on all of the major distros through their package installer. Here is how you check to see if it is installed in a "Yum" style system:
# rpm -qa | grep -i openssl
The above command should return the following packages, or something similar:
openssl-0.9.8e-7.el5 openssl-0.9.8e-7.el5 openssl-devel-0.9.8e-7.el5
If it didn't you'll want to run the following:
# yum install openssl openssl-devel

Generate the RSA key

Create a RSA key for your Apache server, since every distro is different in where to place the certificates, we are just going to place it in an arbitrary spot:
# mkdir ~/domain.com.ssl/ # cd ~/domain.com.ssl/
Type the following command to generate a private key.
# openssl genrsa -out domain.com.key 2048

Create a CSR

Type the following command to create a CSR with the RSA private key (output will be PEM format):
# openssl req -new -sha256 -key domain.com.key -out domain.com.csr
When creating a CSR you must follow these conventions. Enter the information to be displayed in the certificate. The following characters can not be used for the Organization Name or the Organizational Unit: < > ~ ! @ # $ % ^ * / \ ( ) ?.,&
DN FieldExplanationExample
Common NameThe fully qualified domain name for your web server. This must be an exact match.If you intend to secure the URL https://www.yourdomain.com, then your CSR's common name must be www.yourdomain.com. If you plan on getting a wildcard certificate make sure to prefix your domain with an asterisk, example: *.domain.com.
OrganizationThe exact legal name of your organization. Do not abbreviate your organization name.domain.com
Organization UnitSection of the organizationIT
City or LocalityThe city where your organization is legally located.Wellesley Hills
State or ProvinceThe state or province where your organization is legally located. Can not be abbreviated.Massachusetts
CountryThe two-letter ISO abbreviation for your country.US
Do not enter extra attributes at the prompt.
  • Warning: Leave the challenge password blank (press enter)

Verify your CSR

# openssl req -noout -text -in domain.com.csr

Submit your CSR

From this point you have to take your CSR that you created here and submit it to a certificate authority. Ones that we recommend are going to be Verisign, Thawte and RapidSSL. There are also a number of other certificate authorities out there, shop around.

Senin, 07 September 2015

How to install and configure Nagios in FreeBSD

Source : http://www.unixmen.com/how-to-install-and-configure-nagios-in-freebsd/
*there is some part I modified to make some improvement.
Nagios is a popular open source computer system and network monitoring software application. It watches hosts and services, alerting usersnagios_logo when things go wrong and again when they get better.
Nagios was originally designed to run under Linux, but also runs well on other Unix variants. It is free software, licensed under the terms of the GNU General Public License version 2 as published by the Free Software Foundation.

In this tutorial will show you how to install Nagios in freeBSD (Tested on FreeBSD 8.1  and  8.2).
We will start by installing AMP and then we will install Nagios.
1-  Install Mysql Server 5.5 from ports
cd /usr/ports/databases/mysql55-servermake install clean
2- Enable and launch the mysql service
echo 'mysql_enable="YES"' >> /etc/rc.conf
3- Start mysql server
/usr/local/etc/rc.d/mysql-server start
4- Make mysql  admin password
mysqladmin -u root password "newpassword"
5-Install  Apache  from ports
cd /usr/ports/www/apache22 make install clean 
Enable mysql-support in the blue screen
6-Enable and launch the apache service
echo 'apache22_enable="YES"' >> /etc/rc.conf
 
Start Apache:
/usr/local/etc/rc.d/apache22 start
test ths apache page http://ip or http://hostname


7-Install  PHP and  php-extention
 
cd /usr/ports/lang/php52
make install clean
Make sure to enable apache module in the install  Step (Blue screen) and
cd /usr/ports/lang/php52-extensions
make install clean
In this  installation screen select sessions and mysql support
8-After this  Activate  the  php configuration with
cp /usr/local/etc/php.ini-dist /usr/local/etc/php.ini
9-configure apache to read the PHP files
edit /usr/local/etc/apache22/httpd.conf and add
DirectoryIndex index.php index.html index.htm AddType application/x-httpd-php .phpAddType application/x-httpd-php-source .phps
10-Restart   apache  to check if  you  have  any  errors
# /usr/local/etc/rc.d/apache22 restart
Output:
Performing sanity check on apache22 configuration:
Syntax OK
Stopping apache22.
Waiting for PIDS: 61539.
Performing sanity check on apache22 configuration:
Syntax OK
Starting apache22.
11-Check  phpinfo page
Document root  starndart in apache  is    /usr/local/www/apache22/data
Add the code to the file test.hpecho “<? phpinfo(); ?>” >> /usr/local/www/apache22/data/test.php

Now check the page http://ip/test.php


12-Install Nagios:
cd /usr/ports/net-mgmt/nagios
make install clean
And  accept  default  installation, in   installation screen  of  nagios plugins dont forget to  add  NETSNMP to nagios group and user.
13-Enable nagios  to  start  with  boot
echo 'nagios_enable="YES"' >> /etc/rc.conf
Now copy the sample page to the config files
cd /usr/local/etc/nagios/
cp cgi.cfg-sample cgi.cfg
cp nagios.cfg-sample nagios.cfg
cp resource.cfg-sample resource.cfg

Navigate to the /usr/local/etc/nagios/objects/ and  do the  same :
cp commands.cfg-sample commands.cfg
cp contacts.cfg-sample contacts.cfg
cp localhost.cfg-sample localhost.cfg
cp printer.cfg-sample printer.cfg
cp switch.cfg-sample switch.cfg
cp templates.cfg-sample templates.cfg
cp timeperiods.cfg-sample timeperiods.cfg
14-Now check you nagios configurations errors
#  nagios -v  /usr/local/etc/nagios/nagios.cfg
15-Make admin password for nagios home page (admin is nagiosadmin)
htpasswd -c /usr/local/etc/nagios/htpasswd.users nagiosadmin
16-Now  add  Nagios  to  your  apache  configuration:
edit  /usr/local/etc/apache22/httpd.conf  and  add:
LoadModule php5_module        libexec/apache22/libphp5.so
LoadModule cgi_module         libexec/apache22/mod_cgi.so
<IfModule php5_module>
       DirectoryIndex index.php index.html
       AddType application/x-httpd-php .php
       AddType application/x-httpd-php-source .phps
   </IfModule>

ScriptAlias /nagios/cgi-bin/ /usr/local/www/nagios/cgi-bin/
Alias /nagios /usr/local/www/nagios/
<Directory /usr/local/www/nagios>
Options None
AllowOverride None
Order allow,deny
Allow from all
AuthName “Nagios Access”
AuthType Basic
AuthUSerFile /usr/local/etc/nagios/htpasswd.users
Require valid-user
</Directory>
<Directory /usr/local/www/nagios/cgi-bin>
Options ExecCGI
AllowOverride None
Order allow,deny
Allow from all
AuthName “Nagios Access”
AuthType Basic
AuthUSerFile /usr/local/etc/nagios/htpasswd.users
Require valid-user
</Directory>

save  the  config and exit
17-Restart apache to check if any errors
/usr/local/etc/rc.d/apache22 restart
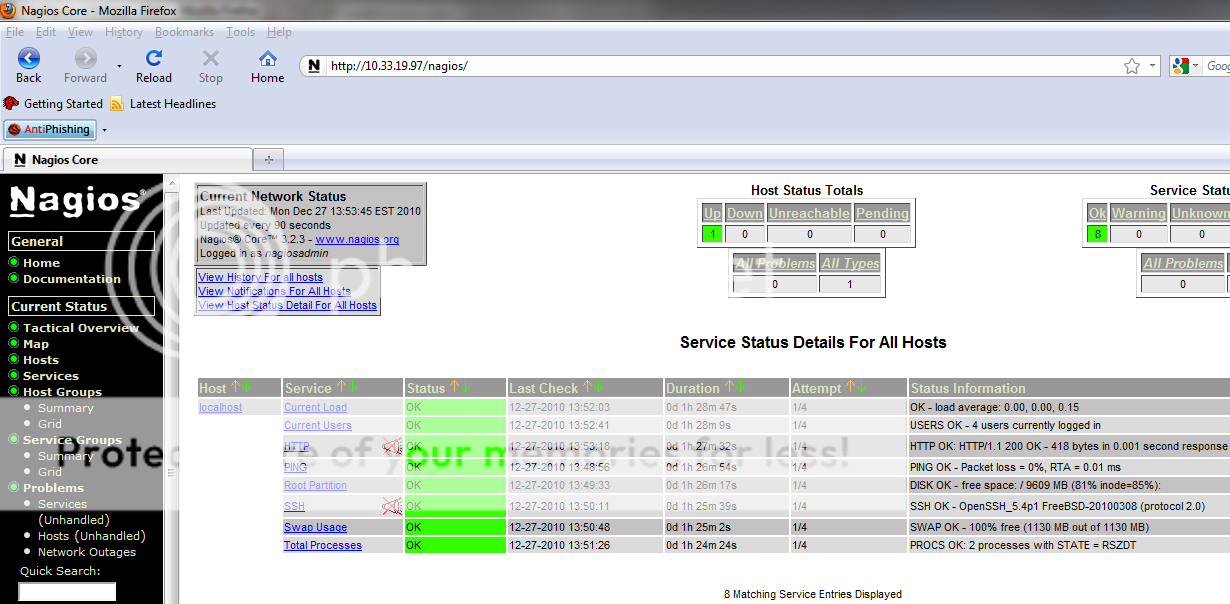
Now  open your  nagios  page  with  Http://ip/nagios and  insert  your  login and  password created  before


to setiing authentication permissions you must edit cgi.cfg
like below :

a) add an user to Nagios via command htpasswd htpasswd.users username
b) in cgi.cfg file add this user to lines:
authorized_for_system_information=nagiosadmin, username
authorized_for_configuration_information=nagiosadmin, username
authorized_for_system_commands=nagiosadmin, username
authorized_for_all_services=nagiosadmin, username
authorized_for_all_hosts=nagiosadmin, username
authorized_for_all_service_commands=nagiosadmin, username
authorized_for_all_host_commands=nagiosadmin, username

Selasa, 01 September 2015

sshguard

Source : http://howtounix.info/howto/sshguard-freebsd
sshguard is a security tool protecting networked hosts from brute force attacks against ssh servers. It detects these attacks and blocks attacker's address creating a firewall rule.

sshguard with pf

Installing sshguard from ports:
cd /usr/ports/security/sshguard-pf
make install clean
Add to /etc/syslog.conf:
auth.info;authpriv.info |exec /usr/local/sbin/sshguard -a 15 -p 9200 -s 12000
Edit pf.conf:
table <sshguard> persist
block in quick on re0 proto tcp from <sshguard> to any port ssh label "ssh brute"
change re0 to your external interface name.
This command will display addresses in the table:
pfctl -t sshguard -T show
To delete an address from the table (for example 192.168.1.5) use:
pfctl -t sshguard -T delete 192.168.1.5

sshguard with ipfw

It's easy to install and configure sshguard with ipfw.sshguard:
cd /usr/ports/security/sshguard-ipfw/
make install clean
There are no build options so you can get straight to configuring.

Configuring sshguard

Add to /etc/syslog.conf:
auth.info;authpriv.info |/usr/local/sbin/sshguard -w 192.168.1.10
-w command-line option is used for whitelisting. This option can add explicit addresses, host names and address blocks. Specify the address directly, like:
-w 192.168.1.10
or in multiple occurrences:
-w 192.168.1.10 -w 192.168.1.11 -w 192.168.1.12
sshguard detects 4 attack attempts as brute force by default. You can change this number using -a option. When brute force is detected sshguard adds new rule to firewall rules: deny ip from brute.ip.add.ress to me
This rule will be deleted in 420 seconds. If the attack from this address happens again block time doubles.
-b option is used for creating blacklists. -b 10:/var/db/sshguard/blacklist.db means that after 10 firewall blocks the address will be put on the blacklist and blocked forever. Blocking rules are in 55000-55050 IDs range.

source : http://www.sshguard.net/docs/man/sshguard/1_5/
Depending on the way chosen for giving logs to sshguard, and depending on the chosen blocking system, some setup may be needed. Instructions are documented at http://www.sshguard.net/docs/setup/.
sshguard does not make use of any configuration file. Instead, a combination of optional arguments can be passed to its process on the command line, for modifying its default behaviour:
-b [num:]filename
enable blacklisting: blacklist after num (or 3) blocked abuses, and hold the permanent blacklist in filename. SeeTOUCHINESS & BLACKLISTING below.
-v
print summary information on sshguard and exit.
-l source
enable the Log Sucker, and add source to the list of log sources to monitor. source is a filename, a FIFO name, or the magic symbol "-" to identify sshguard's standard input. sshguard handles autonomously file-like sources disappearing, reappearing, or "rotating". This option can be used multiple times. When omitted, source defaults to standard input. Otherwise, standard input is ignored unless explicitly added.
-a sAfety_thresh
block an attacker after it incurred a total dangerousness exceeding sAfety_thresh. Most attacks incur dangerousness 10. See http://www.sshguard.net/docs/reference/attack-signatures/ for details. (Default: 40)
-p secs
release a blocked address not sooner than secs seconds after being blocked. sshguard will release the address between X and 3/2 * X seconds. (Default: 7*60)
-s secs
forget about an address after secs seconds. If host A issues one attack every this many seconds, it will never be blocked. (Default: 20*60)
-w addr/host/block/file
see the WHITELISTING section.
-f servicecode:pidfile
see the LOG MESSAGE AUTHENTICATION section.
When sshguard is signalled with SIGTSTP, it suspends activity. When sshguard is signalled with SIGCONT, it resumes monitoring. During suspension, log entries are discarded without being analyzed
When sshguard senses the SSHGUARD_DEBUG environment variable, it enables debugging mode: logging is directed to standard error instead of syslog, and includes comprehensive details of the activity and parsing process. Debugging mode can help investigating patterns: once enabled, a pattern can be directly pasted into the tool from the console, and the behavior is immediately and minutely shown beneath.

WHITELISTING

sshguard supports address whitelisting. Whitelisted addresses are not blocked even if they appear to generate attacks. This is useful for protecting lame LAN users (or external friendly users) from being incidentally blocked.
Whitelist addresses are controlled through the -w command-line option. This option can add explicit addresses, host names and address blocks:
addresses
specify the numeric IPv4 or IPv6 address directly, like:
-w 192.168.1.10
or in multiple occurrences:
-w 192.168.1.10 -w 2001:0db8:85a3:0000:0000:8a2e:0370:7334
host names
specify the host name directly, like:
-w friendhost.enterprise.com
or in multiple occurrences:
-w friendhost.enterprise.com -w friend2.enterprise.com
All IPv4 and IPv6 addresses that the host resolves to are whitelisted. Hosts are resolved to addresses once, when sshguard starts up.
address blocks
specify the IPv4 or IPv6 address block in the usual CIDR notation:
-w 2002:836b:4179::836b:0000/126
or in multiple occurrences:
-w 192.168.0.0/24 -w 1.2.3.128/26
file
When longer lists are needed for whitelisting, they can be wrapped into a plain text file, one address/hostname/block per line, with the same syntax given above.
sshguard can take whitelists from files when the -w option argument begins with a `.' (dot) or `/' (slash). This is a sample whitelist file (say /etc/friends):
# comment line (a '#' as very first character)
#   a single IPv4 and IPv6 address
1.2.3.4
2001:0db8:85a3:08d3:1319:8a2e:0370:7344
#   address blocks in CIDR notation
127.0.0.0/8
10.11.128.0/17
192.168.0.0/24
2002:836b:4179::836b:0000/126
#   hostnames
rome-fw.enterprise.com
hosts.friends.com
And this is how sshguard is told to make a whitelist up from the /etc/friends file:
sshguard -w /etc/friends
The -w option can be used only once for files. For addresses, host names and address blocks it can be used with any multiplicity, even with mixes of them.

LOG MESSAGE AUTHENTICATION

Syslog and syslog-ng typically insert a PID of the generating process in every log line. This can be checked for authenticating the source of the message and avoid false attacks to be detected because malicious local users inject crafted log lines. This way sshguard can be safely used even on hosts where this assumption does not hold.
Log message authentication is only needed when sshguard is fed log messages from syslog or from syslog-ng. When a process logs directly to a raw file and sshguard is configured for polling logs directly from it, you only need to adjust the log file permissions so that only root can write on it.
For enabling log message authentication on a given service the -f option is used as follows:
-f 100:/var/run/sshd.pid
which associates the given pidfile to the ssh service (code 100). A list of well-known service codes is available athttp://www.sshguard.net/docs/reference/service-codes/.
The -f option can be used multiple times for associating different services with their pidfile:
sshguard -f 100:/var/run/sshd.pid -f 123:/var/run/mydaemon.pid
Services that are not configured for log message authentication follow a default-allow policy (all of their log messages are accepted by default).
PIDs are checked with the following policy:
  1. the logging service is searched in the list of services configured for authentication. If not found, the entry is accepted.
  2. the logged PID is compared with the pidfile. If it matches, the entry is accepted
  3. the PID is checked for being a direct child of the authoritative process. If it is, the entry is accepted.
  4. the entry is ignored.
Low I/O load is committed to the operating system because of an internal caching mechanism. Changes in the pidfile value are handled transparently.

TOUCHINESS & BLACKLISTING

In many cases, attacks against services are performed in bulk in an automated form. For example, the attacker goes trough a dictionary of 150 username/password pairs and sequentially tries to violate the SSH service with any of them, continuing blindly while blocked, and re-appearing once the block expires.
To counteract these cases, sshguard by default behaves with touchiness. Besides observing abuses from the log activity, it monitors also the overall behavior of attackers. The decision on when and how to block is thus made respective to the entire history of the attacker as well. For example, if address A attacks repeatedly and the base blocking time is 420 seconds, A will be blocked for 420 seconds (7 mins) at the first abuse, 2*420 (14 mins) the second, 2*2*420 (28 mins) the third ... and 2^(n-1)*420 the n-th time.
Touchiness has two major benefits: to legitimate users, it grants forgiving blockings on failed logins; to real attackers, it effectively renders large scale attacks infeasible, because the time to perform it explodes with the number of attempts.
Touchiness can be augmented with blacklisting (-b). With this option, after a number of abuses, the address is added to a list of attackers to be blocked permanently. The list is intended to be loaded at each startup, and maintained/extended with new entries during operation. sshguard inserts a new address after it exceeded a threshold of abuses. This threshold is configurable within the -b option argument. Blacklisted addresses are never scheduled for releasing.
The -b command line option enables blacklisting and requires the filename to use for permanent storage of the blacklist. Optionally, a custom blacklist threshold can be prefixed to this path, separated by ':'. For example,
-b 5:/var/db/sshguard/blacklist.db
requires to blacklist addresses after the 5th abuse, and store the blacklist in file /var/db/sshguard/blacklist.db. Although the blacklist file is not meant to be in human-readable format, the strings(1) command can be used to peek in it for listing the blacklisted addresses.

EXTENSIONS

sshguard operates firewalls through a general interface, which enables easy extension, and allows back-ends to be non-local (e.g. remote appliances), and non-blocking (e.g. report tools). Additions can be suggested athttp://www.sshguard.net/feedback/firewall/submit/.
Extending attack signatures needs some expertise with context-free parsers; users are welcome to submit samples of the desired log messages to http://www.sshguard.net/support/attacks/submit/.

SEE ALSO

syslog(1), syslog.conf(5)
sshguard website at: http://www.sshguard.net/