source : https://alanxelsys.com/ceph-hands-on-guide/
This article is just for my personal uses. There are some mistake and not good writing fomat from source article.


This article is just for my personal uses. There are some mistake and not good writing fomat from source article.
Introduction
This guide is designed to be used as a self-training course covering ceph. The first part is a gentle introduction to ceph and will serve as a primer before tackling more advanced concepts which are covered in the latter part of the document.
The course is aimed at engineers and administrators that want to gain familiarization with ceph quickly. If difficulties are encountered at any stage the ceph documentation should be consulted as ceph is being constantly updated and the content here is not guaranteed to apply to future releases.
Pre-requisites
- Familiarization with Unix like Operating Systems
- Networking basics
- Storage basics
- Laptop with 8GB of RAM for Virtual machines or 4 physical nodes
Objectives:
At the end of the training session the attendee should be able to:
- To describe ceph technology and basic concepts
- Understand the roles played by Client, Monitor, OSD and MDS nodes
- To build and deploy a small scale ceph cluster
- Understand customer use cases
- Understand ceph networking concepts as it relates to public and private networks
- Perform basic troubleshooting
Pre course activities
- Download and install Oracle VirtualBox (https://virtualbox.org/)
- Download Ubuntu Trusty Tahr iso image (http://www.ubuntu.com/download/server)
- Or
- Centos V7 https://www.centos.org/download/
Activities
- Prepare a Linux environment for ceph deployment
- Build a basic 4/5 node ceph cluster in a Linux environment using physical or virtualized servers
- Install ceph using the ceph-deploy utility
- Configure admin, monitor and OSD nodes
- Create replicated and Erasure coded pools
- Describe how to change the default replication factor
- Create erasure coded profiles
- Perform basic benchmark testing
- Configure object storage and use PUT and GET commands
- Configure block storage, mount and copy files, create snapshots, set up an iscsi target
- Investigate OSD to PG mapping
- Examine CRUSH maps
About this guide
The training course covers the pre-installation steps for deployment on Ubuntu V14.04, and Centos V7. There are some slight differences in the repository configuration with between Debian and RHEL based distributions as well as some settings in thesudoers file. Ceph installation can of course be deployed using Red Hat Enterprise Linux.
Disclaimer
Other versions of the Operating System and the ceph release may require different installation steps (and commands) from those contained in this document. The intent of this guide is to provide instruction on how to deploy and gain familiarization with a basic ceph cluster. The examples shown here are mainly for demonstration/tutorial purposes only and they do not necessarily constitute the best practices that would be employed in a production environment. The information contained herein is distributed with the best intent and although care has been taken, there is no guarantee that the document is error free. Official documentation should always be used instead when architecting an actual working deployment and due diligence should be employed.
Getting to know ceph – a brief introduction
This section is mainly taken from ceph.com/docs/master which should be used as the definitive reference.
Ceph is a distributed file system supporting block, object and file based storage. It consists of MON nodes, OSD nodes and optionally an MDS node. The MON node is for monitoring the cluster and there are normally multiple monitor nodes to prevent a single point of failure. The OSD nodes house ceph Object Storage Daemons which is where the user data is held. The MDS node is the Meta Data Node and is only used for file based storage. It is not necessary if block and object storage is only needed. The diagram below is taken from the ceph web site and shows that all nodes have access to a front end Public network, optionally there is a backend Cluster Network which is only used by the OSD nodes. The cluster network takes replication traffic away from the front end network and may improve performance. By default a backend cluster network is not created and needs to be manually configured in ceph’s configuration file (ceph.conf). The ceph clients are part of the cluster.

The Client nodes know about monitors, OSDs and MDS’s but have no knowledge of object locations. Ceph clients communicate directly with the OSDs rather than going through a dedicated server.
The OSDs (Object Storage Daemons) store the data. They can be up and in the map or can be down and out if they have failed. An OSD can be down but still in the map which means that the PG has not yet been remapped. When OSDs come on line they inform the monitor.
The Monitors store a master copy of the cluster map.
Ceph features Synchronous replication – strong consistency.

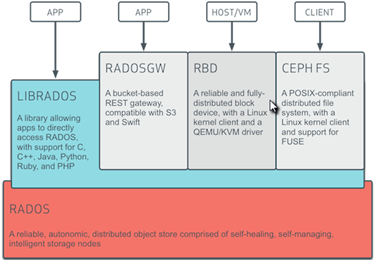
The architectural model of ceph is shown below.

RADOS stands for Reliable Autonomic Distributed Object Store and it makes up the heart of the scalable object storage service.
In addition to accessing RADOS via the defined interfaces, it is also possible to access RADOS directly via a set of library calls as shown above.
Ceph Replication
By default three copies of the data are kept, although this can be changed!
Ceph can also use Erasure Coding, with Erasure Coding objects are stored in k+m chunks where k = # of data chunks and m = # of recovery or coding chunks
Example k=7, m= 2 would use 9 OSDs – 7 for data storage and 2 for recovery
Pools are created with an appropriate replication scheme.
CRUSH (Controlled Replication Under Scalable Hashing)
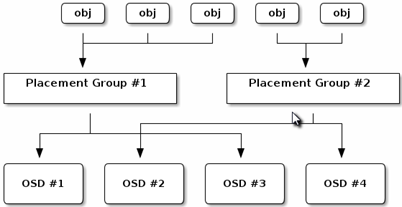
The CRUSH map knows the topology of the system and is location aware. Objects are mapped to Placement Groups and Placement Groups are mapped to OSDs. It allows dynamic rebalancing and controls which Placement Group holds the objects and which of the OSDs should hold the Placement Group. A CRUSH map holds a list of OSDs, buckets and rules that hold replication directives. CRUSH will try not to shuffle too much data during rebalancing whereas a true hash function would be likely to cause greater data movement
The CRUSH map allows for different resiliency models such as:
#0 for a 1-node cluster.
#1 for a multi node cluster in a single rack
#2 for a multi node, multi chassis cluster with multiple hosts in a chassis
#3 for a multi node cluster with hosts across racks, etc.
osd crush chooseleaf type = {n}
Buckets
Buckets are a hierarchical structure of storage locations; a bucket in the CRUSH map context is a location. The Bucket Type structure contains
- id #unique negative integer
- weight # Relative capacity (but could also reflect other values)
- alg #Placement algorithm
- Uniform # Use when all devices have equal weights
- List # Good for expanding clusters
- Tree # Similar to list but better for larger sets
- Straw # Default allows fair competition between devices.
- Hash #Hash algorithm 0 = rjenkins1
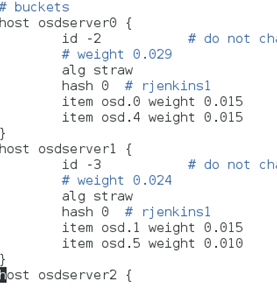
An extract from a ceph CRUSH map is shown following:

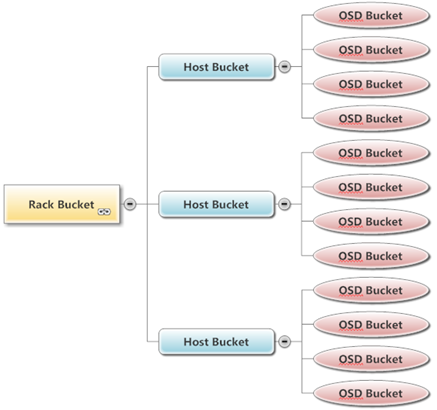
An example of a small deployment using racks, servers and host buckets is shown below.

Placement Groups
Objects are mapped to Placement Groups by hashing the object’s name along with the replication factor and a bitmask
The PG settings are calculated by Total PGs = (OSDs * 100) /#of OSDs per object) (# of replicas or k+m sum ) rounded to a power of two.

Enterprise or Community Editions?
Ceph is available as a community or Enterprise edition. The latest version of the Enterprise edition as of mid-2015 is ICE1.3. This is fully supported by Red Hat with professional services and it features enhanced monitoring tools
such as Calamari. This guide covers the community edition.
such as Calamari. This guide covers the community edition.
Installation of the base Operating System
Download either the Centos or the Ubuntu server iso images. Install 4 (or more OSD nodes if resources are available) instances of Ubuntu or CentOS based Virtual Machines (these can of course be physical machines if they are available), according to the configuration below:
| Hostname | Role | NIC1 | NIC2 | RAM | HDD |
| monserver0 | Monitor, Mgmt, Client | DHCP | 192.168.10.10 | 1 GB | 1 x 20GB Thin Provisioned |
| osdserver0 | OSD | DHCP | 192.168.10.20 | 1 GB | 2 x 20GB Thin Provisioned |
| osdserver1 | OSD | DHCP | 192.168.10.30 | 1 GB | 2 x 20GB Thin Provisioned |
| osdserver2 | OSD | DHCP | 192.168.10.40 | 1 GB | 1 x 20GB Thin Provisioned |
| osdserver3 | OSD | DHCP | 192.168.10.40 | 1 GB | 1 x 20GB Thin Provisioned |
If more OSD server nodes can be made available; then add them according to the table above.
VirtualBox Network Settings
For all nodes – set the first NIC as NAT, this will be used for external access.

Set the second NIC as a Host Only Adapter, this will be set up for cluster access and will be configured with a static IP.

VirtualBox Storage Settings
OSD Nodes
For the OSD nodes – allocate a second 20 GB Thin provisioned Virtual Disk which will be used as an OSD device for that particular node. At this point do not add any extra disks to the monitor node.

Mount the ISO image as a virtual boot device. This can be the downloaded Centos or Ubuntu iso image

Enabling shared clipboard support
- Set GeneralàAdvancedàShared Clipboard to Bidirectional
- Set GeneralàAdvancedàDrag,n,Drop to Bidirectional

Close settings and start the Virtual Machine. Select the first NIC as the primary interface (since this has been configured for NAT in VirtualBox). Enter the hostname as shown.

Select a username for ceph deployment.

Select the disk

Accept the partitioning scheme

Select OpenSSH server

Respond to the remaining prompts and ensure that the login screen is reached successfully.

The installation steps for Centos are not shown but it is suggested that the server option is used at the software selection screen if CentOS is used.